October 24, 2012

the little room, day 8 through 12

i've been painting shadow lines around the stones. i mixed the brown color and the green color i had been using on the wall as well as adding a touch of black acrylic to muddy and darken the mix. i only used this particular color mix because that's what i had on hand.  it's taken 5 days so far only because i'm only in there 3 hours at a time.  it's really tedious, as are most of the steps in this project.

 
today's cloudy and stormy so i've had a hard time capturing a good photo, but i'm going to just throw it out there anyway. 

 
most of my time was spent deciding how many of the blocks get which side shaded.  i have to consider where the light source is.  i laid my little arty paintbrush against the wall to see how much of a shadow it would make to determine where i would paint my shadows.   i think only three blocks are shaded on three sides, oops.

 
no one is actually going to come in to the room and say "wow, for a minute there i thought these were real."  it's like somebody with pink hair - you know it's not real, so you just accept and embrace it for what it is.  at least i hope so.
 
now i have to color wash all of the walls to soften the grout/stone transition.  then paint and stencil all of the doors.  i found this stencil pattern on line while i was searching faux finishes.  

sorry, i don't know who to credit this photo to
 i have no hope of replicating the effect because i barely know what i am doing anyway, much less this stunning effect. isn't it great?
 
i just got my new stencil from royaldesignstudio.com.  it comes in large and small.  i'm going to use it on the big closet doors so i ordered the large and it was $$$.  $39.00!! yikes.   i'm looking forward to using it, though i don't yet know what i'm going to do.  i really like the look of the blue and rust.  it looks like looking outside through a trellis.  and the blue color would be nice to break up all the gold and brown stones in the room.  hmmm, dare i?
 
photo courtesy of royaldesignstudio.com website

October 17, 2012

green chile chicken enchiladas

wow-wee i made the best ‘chiladas last night!  full of flavor and very pretty too! it's just the two of us at home so i made a small dish. i use a whole already-roasted chicken and just shred however much i need. freeze the rest.  this recipe is for one small casserole, about 2 quarts, but it’s large enough for leftovers.


preheat oven to 350 degrees.

shred about two cups of chicken. Season with about 1 teaspoon ground cumin and 1 teaspoon chili powder, adjust for your heat preference. depending on my mood i may add crushed red pepper too. generously salt and pepper. set aside.

chop about 1/2 - 3/4 of an onion. set some aside to sprinkle on top of each of the finished servings. set aside.

heat about 6 tablespoons of canola oil in a small fry pan. lightly fry about 8 corn tortillas (i use white corn), just enough to soften. let drain on a plate of paper towels.   sprinkle each tortilla with salt and pepper as soon as you put them on the toweling.  lay another set of papertowels over the fried tortillas and place newly fried tortillas on top.  set aside.

lightly spray casserole dish with nonstick cooking spray.  pour a bit of green enchilada sauce from a 15 oz can on the bottom of the casserole dish, just enough to lightly cover the bottom.  this not only helps with sticking, but keeps the tortillas moist.

place 3-4 tortillas on the bottom of the dish.  sometimes i cut them in half to more easily arrange them depending on the shape of the dish i use.  start layering: sprinkle chicken over tortillas; sprinkle onions and shredded cheese over chicken; pour half of remaining sauce over top.  cover with rest of tortillas, then cheese.  pour remaining chile sauce over top.  cover with foil and bake for 30 minutes.

after 30 minutes, remove foil and let bake another 10 minutes. let the dish rest outside of the oven for about 15 minutes, covered with the foil - it’s easier to cut and serve.

serve with shredded cheese, remaining onions, sour cream, and a side of pintos that have been lightly seasoned with garlic powder, onion powder, salt and pepper to taste.

it's easy to do another layer if you're so inclined but, aside from the obvious of using more ingredients, you'll certainly want more enchilada sauce.  bueno apettito ya'll.

October 11, 2012

the little room that could day 5, day 6, day 7

so here we are on day 5.  i selected behr's interior satin colors warm muffin (330D-4) and lightweight beige (330C-2) for my base colors over the grout color.  i used a split pan and roller set to get two colors on at the same time.

 
the rollers leave a great pattern and make a really nice blend.


 when it came time to do behind the door and the little tiny strip to the left of the trim, i used a little edging brush.  i dabbed the brush along the wall intermittently then switched colors.  it blends real well so it doesn't look like a patch job.  besides it's going to be covered by the next layer of color.


here's how it looks finished.  i've used these tools and this technique in other rooms.  using different colors and a color wash you can achieve beautiful faux finish results, and it's really, really easy.  the roller does the work for you.


day 6,7, and beyond

for my color coat i again chose behr's interior satin/eggshell.  my "brown" is called cinnamon brand (230D-7), my "green" is called wilderness (390F-7), and my "red" is called spanish leather (300D-7). 
 
it was my intention to use a couple swipes of each color and blend them on the wall.  by the time i finished about four blocks i found they weren't blending well.  it was difficult to get them to "move" on the wall.  i used floetrol with the two beige base colors to help move the paint around, but i was too lazy to mix up three new batches in three buckets for my three colors.  i had two small spray bottles i attempted to use to wet the wall and "smoosh" the paint around but, naturally, both were broken.  i decided to just dip the paint brush into all three colors at once.  this worked pretty well and i could blend the paint and push it around with a rag.  here's what it looked like with finished.


i was feeling nauseous at this point.  it was really bold and alot darker than i wanted.  it was not looking like my muse wall.  i know i could paint over it with the beige basecoats again and choose different colors, but i wasn't sure if i hated it or if i just didn't love it.  i decided to just finish it.  if it all came out like the dog's breakfast, there's always "builder beige".  when i started taking the tape off the walls it seemed to change the character.

 
i guess i wasn't violently opposed to it and just took all the tape off.  here it is almost finished.  i still have to shadow the blocks and then put a glaze over the top since the contrast between the grout and blocks is pretty stark.  i also need to paint the ceiling.  i need to paint the trim, and i have no idea what i'm going to do with the closet doors and the back of the main door.  right now they're just gigantic white monoliths.  it almost hurts to look at them.
 
the colors keep changing with each photograph depending on the light in the room, the flash, and the angle.  the photos below are the most accurate.


okay, maybe it's not so horrible.  it's alot darker than i wanted, but it's doable.  i haven't selected my fabrics yet, but i think it'll look good with those cute little twin beds i bought.
 
i have to take a nap now.

October 2, 2012

the little room that could, day 2, day 3, day 4. ugh.

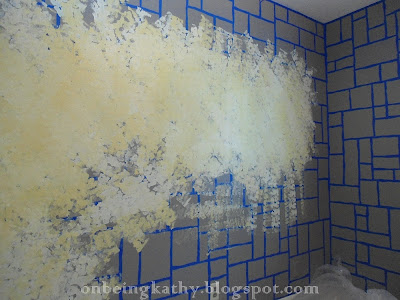
a new day.  i painted the room.  i chose behr's creek bend, a gray paint that will serve as my "grout".  i absolutely love behr paint.  i have one of their fan decks and it weights about 4 pounds.  it gives great coverage.  you can get it with the primer mixed right in, if necessary.  i have decided to do a faux stone wall. 

no, this is not my room, just my muse.  love the stones and colors.
i've been looking at a lot of faux stone walls on-line and decided to keep my stones a little more structured than those in the photo above.  i thought i would run a level around the room and mark out my grout lines, but couldn't figure out how i could see the pencil marks on the charcoal colored walls to line up the tape and i didn't want to use something that i would have to paint over again when the project was finished.  because i was going to tear the tape in such a way as to create a chiseled effect i was going to have to tape over the line.  so i decided to "wing it" and just started putting tape on the walls; no level, no pencil, no hassle.
 
 
i started by putting a 3/4" wide piece of painter's tape on the wall and tore it in half length wise.  i did a bunch of them and just lined them up for quick access.
 
 
i then put them up randomly to get started.  i placed one half of the tape horizontally, then placed another half on the bottom, except turned it around so the two straight edges were together.  this makes the lines chiseled and uneven, which gives a great edge to the grout lines.  be sure to overlap the straight edges so it makes a secure seam.  i mix pieces, not the same pieces from the same tape, as it gives a serpentine or wavy line, which is not what i want.  anyway, practice to find what you like. 
 
 
putting up the lines randomly helps me to get started so i don't get stuck trying to make them perfect; i just started putting up pieces and didn't get focused on symmetry.  i appreciate the "randomness". 

oh, sure, one might just paint the room the base color and do all the faux finishes then paint the grout lines on later, but i'm not that "one".  i am not artistic in the sense that i can "see" the grout lines.  i'm not a faux artist, just someone who wants what she wants, but can't afford to have someone else just do it for her, so i just muster up the courage and i soldier on.  either i come out with both barrels blazin' or just shoot myself in the foot.
 
 
end of day 1
 
 
day 2, 3, 4, etc.
 
 
this is the result of many, many, many hours of tearing and taping {and many, many oreos}.  i had to take one day off in between to rest my sore little fingers.  i don't know what i'd do without my ipod, this part is creative, but tee-dee-us.
 
 
but i'm better now. 


now it's gettin' excitin'!  time to pick out paint colors!  off to home depot.